Wet areas are the spaces where sanitary installations are made or those that are exposed to water, moisture, or rain. Spaces like water closets, bathrooms, kitchens, and balconies are considered wet areas.
Based on the concentration, frequency, and the period during which these areas were exposed to water, the uninterrupted water can seriously damage the reinforcements below and lead to damp walls, flaked paint, fungal growth, & several health issues, also ruining the aesthetic features of the building.
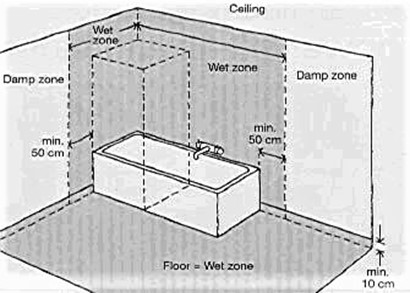
Here is an illustration of the common wet and damp areas in a washroom:
Waterproofing chemicals create a shield for concrete surfaces to prevent dampness and eliminate water movement in these wet areas.
Common Causes of Water Leakage in Wet Areas
Water leakages in wet areas arise due to:
- Loose plumbing
- Improper fixtures
- Bad construction designs
- Lack of waterproofing systems
- Substandard waterproofing products
These leakages arise mostly in the joints between pipes, junction joints between the sink and wall, floor traps, ventilation, and joints between floor tiles.
Design Considerations for Wet Area Waterproofing
The waterproofing product used must accommodate the movement of the structure and prevent any water damage to the substrate, its surrounding walls, or the flooring.
Moreover, the consultants must consider both local and international standards, specifications, and technologies when designing these areas, with all drawings and specifications to be prepared in detail, taking into consideration the bonding effectiveness of the substrate and waterproof membrane.
The experts at ECMAS elaborate on five key spaces in wet areas where the surface preparation and the waterproofing systems can be improved to prevent dampness and water leakage. They are:
Floor
- The slab must be of at least M25 grade concrete mixed with a waterproofing compound, with a slope of 1:100. The waterproofing system must be maintained as a concrete slab topped by a waterproofing membrane, screed, and tile finish.
- Add a sufficient drop during concrete casting so the finished level of the area is adequately lower than its surroundings to prevent water from moving to dry areas.
- Provide concrete kerbs that can prevent water movement into the dry areas. The kerbs must be constructed at the base of the walls, at a height of at least 100 mm, to act as effective water barriers.
Wall
- Either minimize the wall joints or treat them with polymer-modified mortar (if unavoidable). Also, the wall must be rendered to a height of at least 300 mm from the floor for a smoother finish.
- In wet areas with a lot of water splash, the waterproofing membrane must turn up at a minimum height of 300 mm to provide adequate tanking protection against water migration.
- In bathrooms, ensure that the waterproofing membrane is applied to a height and width of at least 1800mm and 1500 mm. Moreover, the wall behind the basin or sink must have a waterproofing membrane to a height of 300 mm or more.
Pipes & Penetrations
- Reduce the number of penetrations through the wall or slab and group the common discharge stacks. This boosts the life of the waterproofing membrane and reduces the chances of leakage.
- Avoid leaving a free area between the waste & drain pipes, hiding drain pipes in dry areas screed, and chasing the walls and floors.
- Ensure that the membrane is dressed down to 50 mm or more into the floor outlet and up at the pipe penetrations to the floor levels. Moreover, it must be applied to the pipe horizontally to about 100 mm.
Air Circulation & Ventilation
- The air circulation and ventilation measures must extract dampness, eliminate odor, and reduce mold growth on the floors, walls, and ceilings. This can be achieved by natural and mechanical means or a mix of both.
- The ventilation ducts and exhaust fans must be within three meters of the intake grill or fan inlet with a minimum outdoor air supply to be around ten air changes per hour (ACPH) for natural ventilation and 15 for mechanical ventilation.
- The air from the exhaust must be discharged to an outer area at least 5 meters away from any wall and 2 meters away from the pavement.
Plumbing
- Provide detailed drawings of pipe layout cast with the floor, including details on gradients of pipes, connections, and joints.
- Reduce the number of pipes and wet wall penetrations via the floor and wall using a single wet wall design and a common discharge stack.
- Minimize the contact between pipes and water and decrease the chances of water leakage through pipe penetration by providing raised floors.
Protection of Waterproofing Membrane
After waterproofing the wet areas, it is not advised to lay the tiles directly on the membrane. Experts recommend placing a protective screed or plaster on the membrane to protect it against damage before laying the tiles.
The screed must be in a slope towards the drain pipe on the floor and the tiles must then be placed with a screed-compatible tile adhesive.
Want to know more about effective waterproofing for wet areas? ECMAS is one of the leading waterproofing chemical manufacturers and has a team of experts who can help you solve all your waterproofing problems.
Reach out to us today to know more!